
Download PDF
Using THINGSEE LEAKAGE RUGGED sensor
Overview
Thingsee LEAKAGE RUGGED is designed to detect the presence of water beneath the device. It activates when water covers the two detection pins located at the bottom of the sensor (effective in water layers wider than 2.4 cm).
Placement:
For optimal results, position the sensor pins down in areas prone to water collection or where leaks are likely to occur first. For larger areas, consider using multiple sensors to ensure comprehensive coverage.
Applications:
This sensor is suitable for:
- Spaces where only small detection probes fit, such as narrow or corner areas.
- Locations such as drain pans, floor drains, and pits.
- Areas where water is likely to accumulate initially.
Operation:
Thingsee LEAKAGE RUGGED must contact a sufficient amount of water to trigger an alarm. Always verify that water flows to the sensor’s location either visually or through testing before installation.
Functionality:
The sensor employs event-based messaging. It is set to report changes in water presence immediately, and stable conditions are reported hourly.
Suitability:
The Thingsee LEAKAGE RUGGED is specifically engineered for water leak detection. It should not be used with hazardous chemicals, solvents, oil, fuel, strong acids, or other corrosive substances. Performance may vary with different liquids; for instance, responses differ between tap water and seawater. Regular checks are recommended if a significant drop in measurement values is observed.
Data Interpretation:
In dry conditions, the Thingsee LEAKAGE typically reports a value of 50,000,000. Adjustments to the baseline and alert levels may be necessary depending on the specific installation environment.
Refer to the included illustration showing various values reported by the Thingsee LEAKAGE under different conditions without the Base and Detection Rope.
Thingsee LEAKAGE (without Rope & Base):
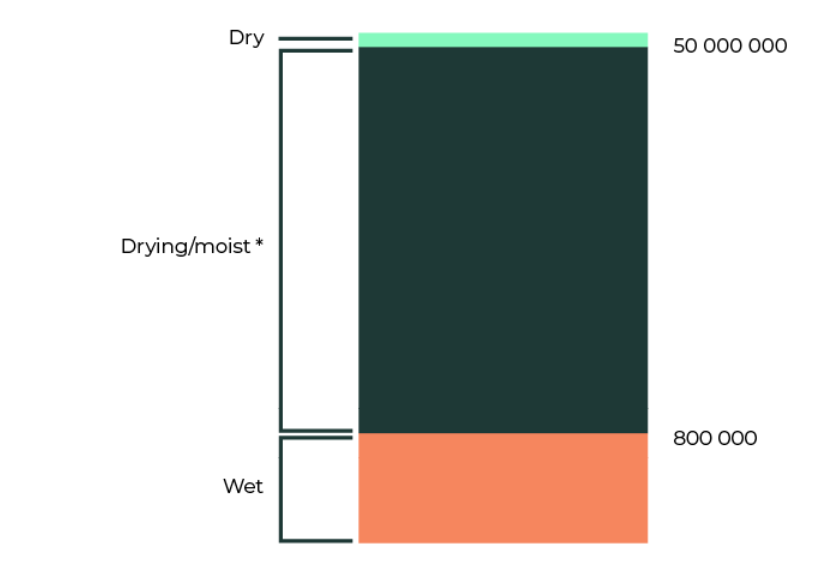
* When the sensor’s surface is wet and beginning to dry, you can expect to see values ranging from 800,000 to 50,000,000. Similar readings may also occur if the sensor’s pins are in direct contact with a conductive surface, such as metal or moisture-laden concrete with conductive additives.
To avoid false readings, it’s crucial to use the included tape to slightly elevate the pins above the mounting surface. This ensures more accurate detection and helps prevent direct contact with conductive materials.
Base for Thingsee LEAKAGE detects if the Detection Rope is missing, alerting users to improper installations; the Base must never be used without the Rope attached. When the Base and Detection Rope are attached to Thingsee LEAKAGE, the value this device combination reports is between 35 000 000 and 45 000 000 in dry conditions.
The illustration below shows the different values reported by Thingsee LEAKAGE when using the Base and Detection Rope.
Thingsee LEAKAGE with Rope & Base
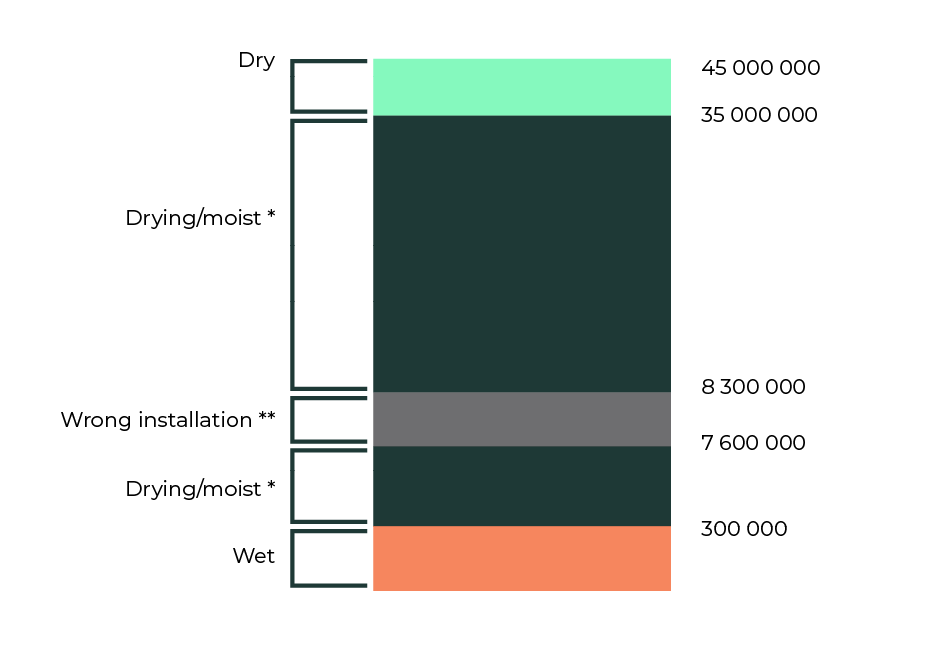
* Expect values between 300,000 and 35,000,000 when surfaces are drying. However, readings between 7,600,000 and 8,300,000 suggest an incorrect installation.
** Thingsee Leakage with base but no rope attached.
To avoid false readings, make sure the installation surface is clean and free from debris, dirt, sticky residues, water spots, or other impurities that may be conductive and cause false positive values.
Installation
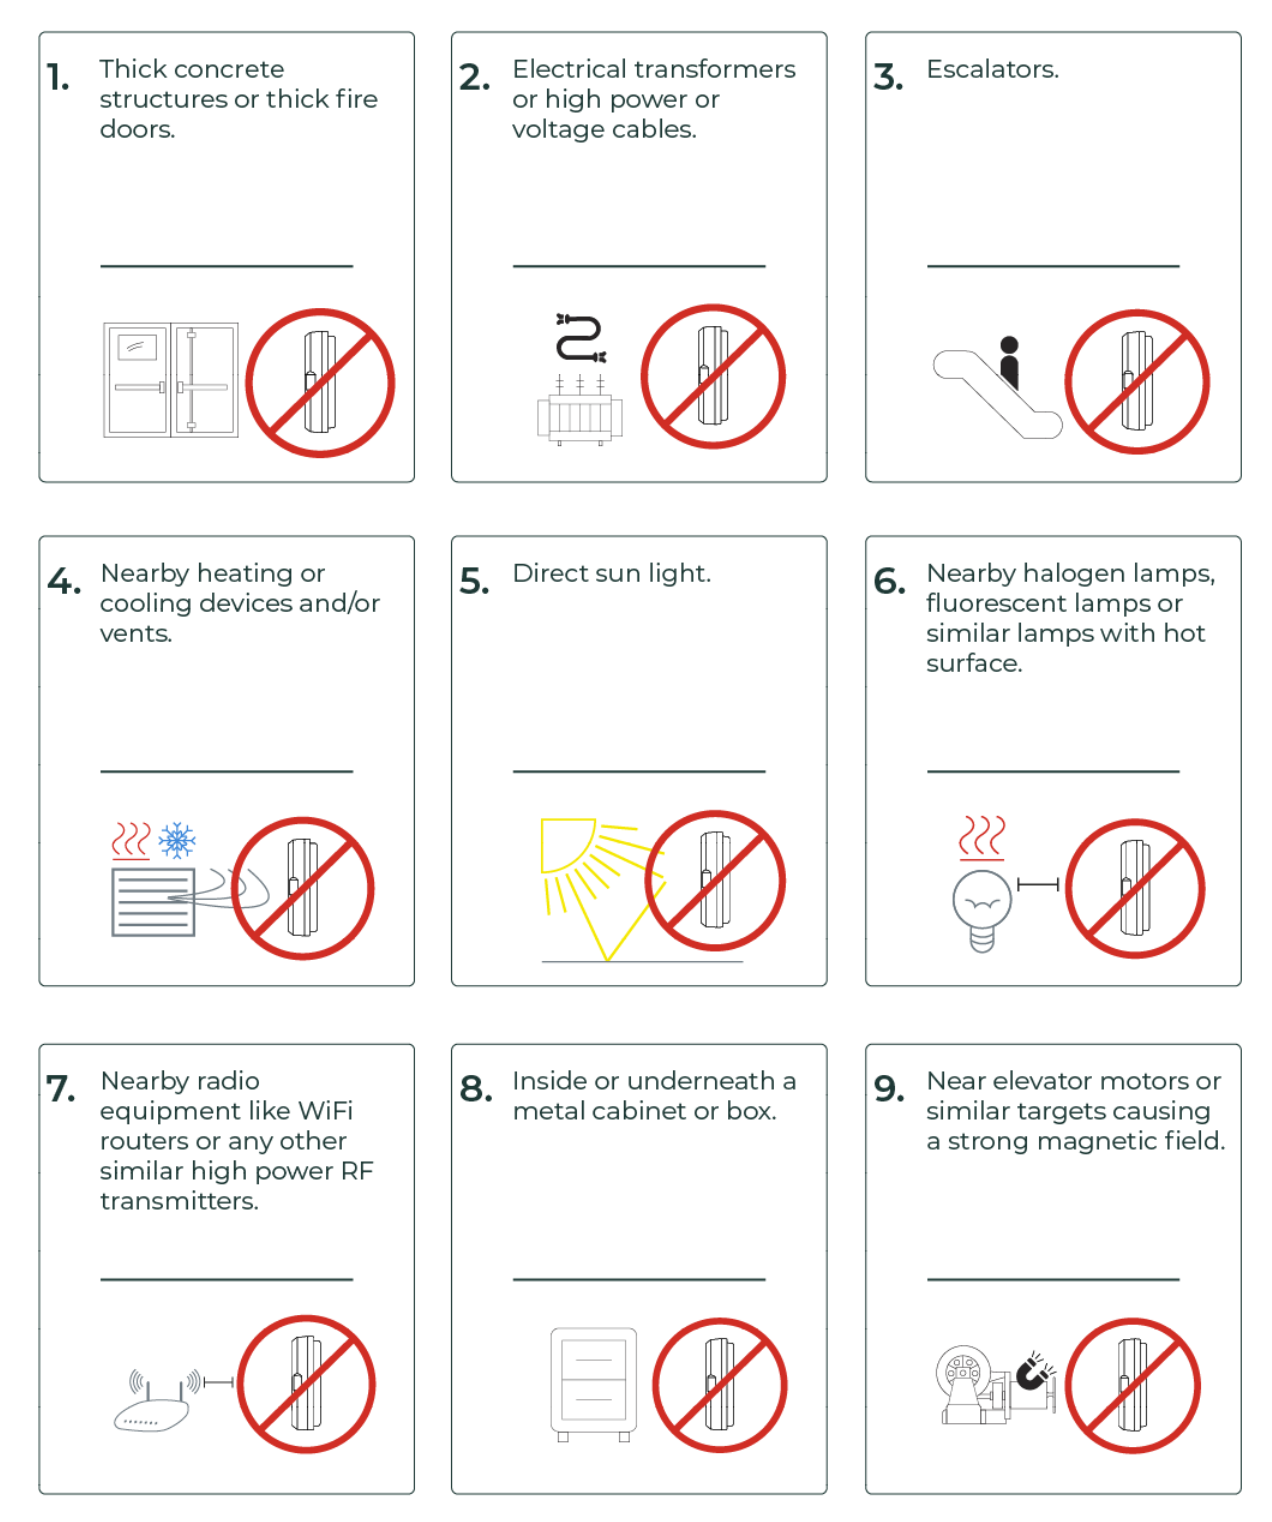
Things to avoid in installation
Avoid installing Thingsee products near the following:
Note before installation
Before installing the sensors, make sure the Thingsee gateway device is installed and connected to a mobile network (LED blinking green).
Preparing the Sensor for installation:
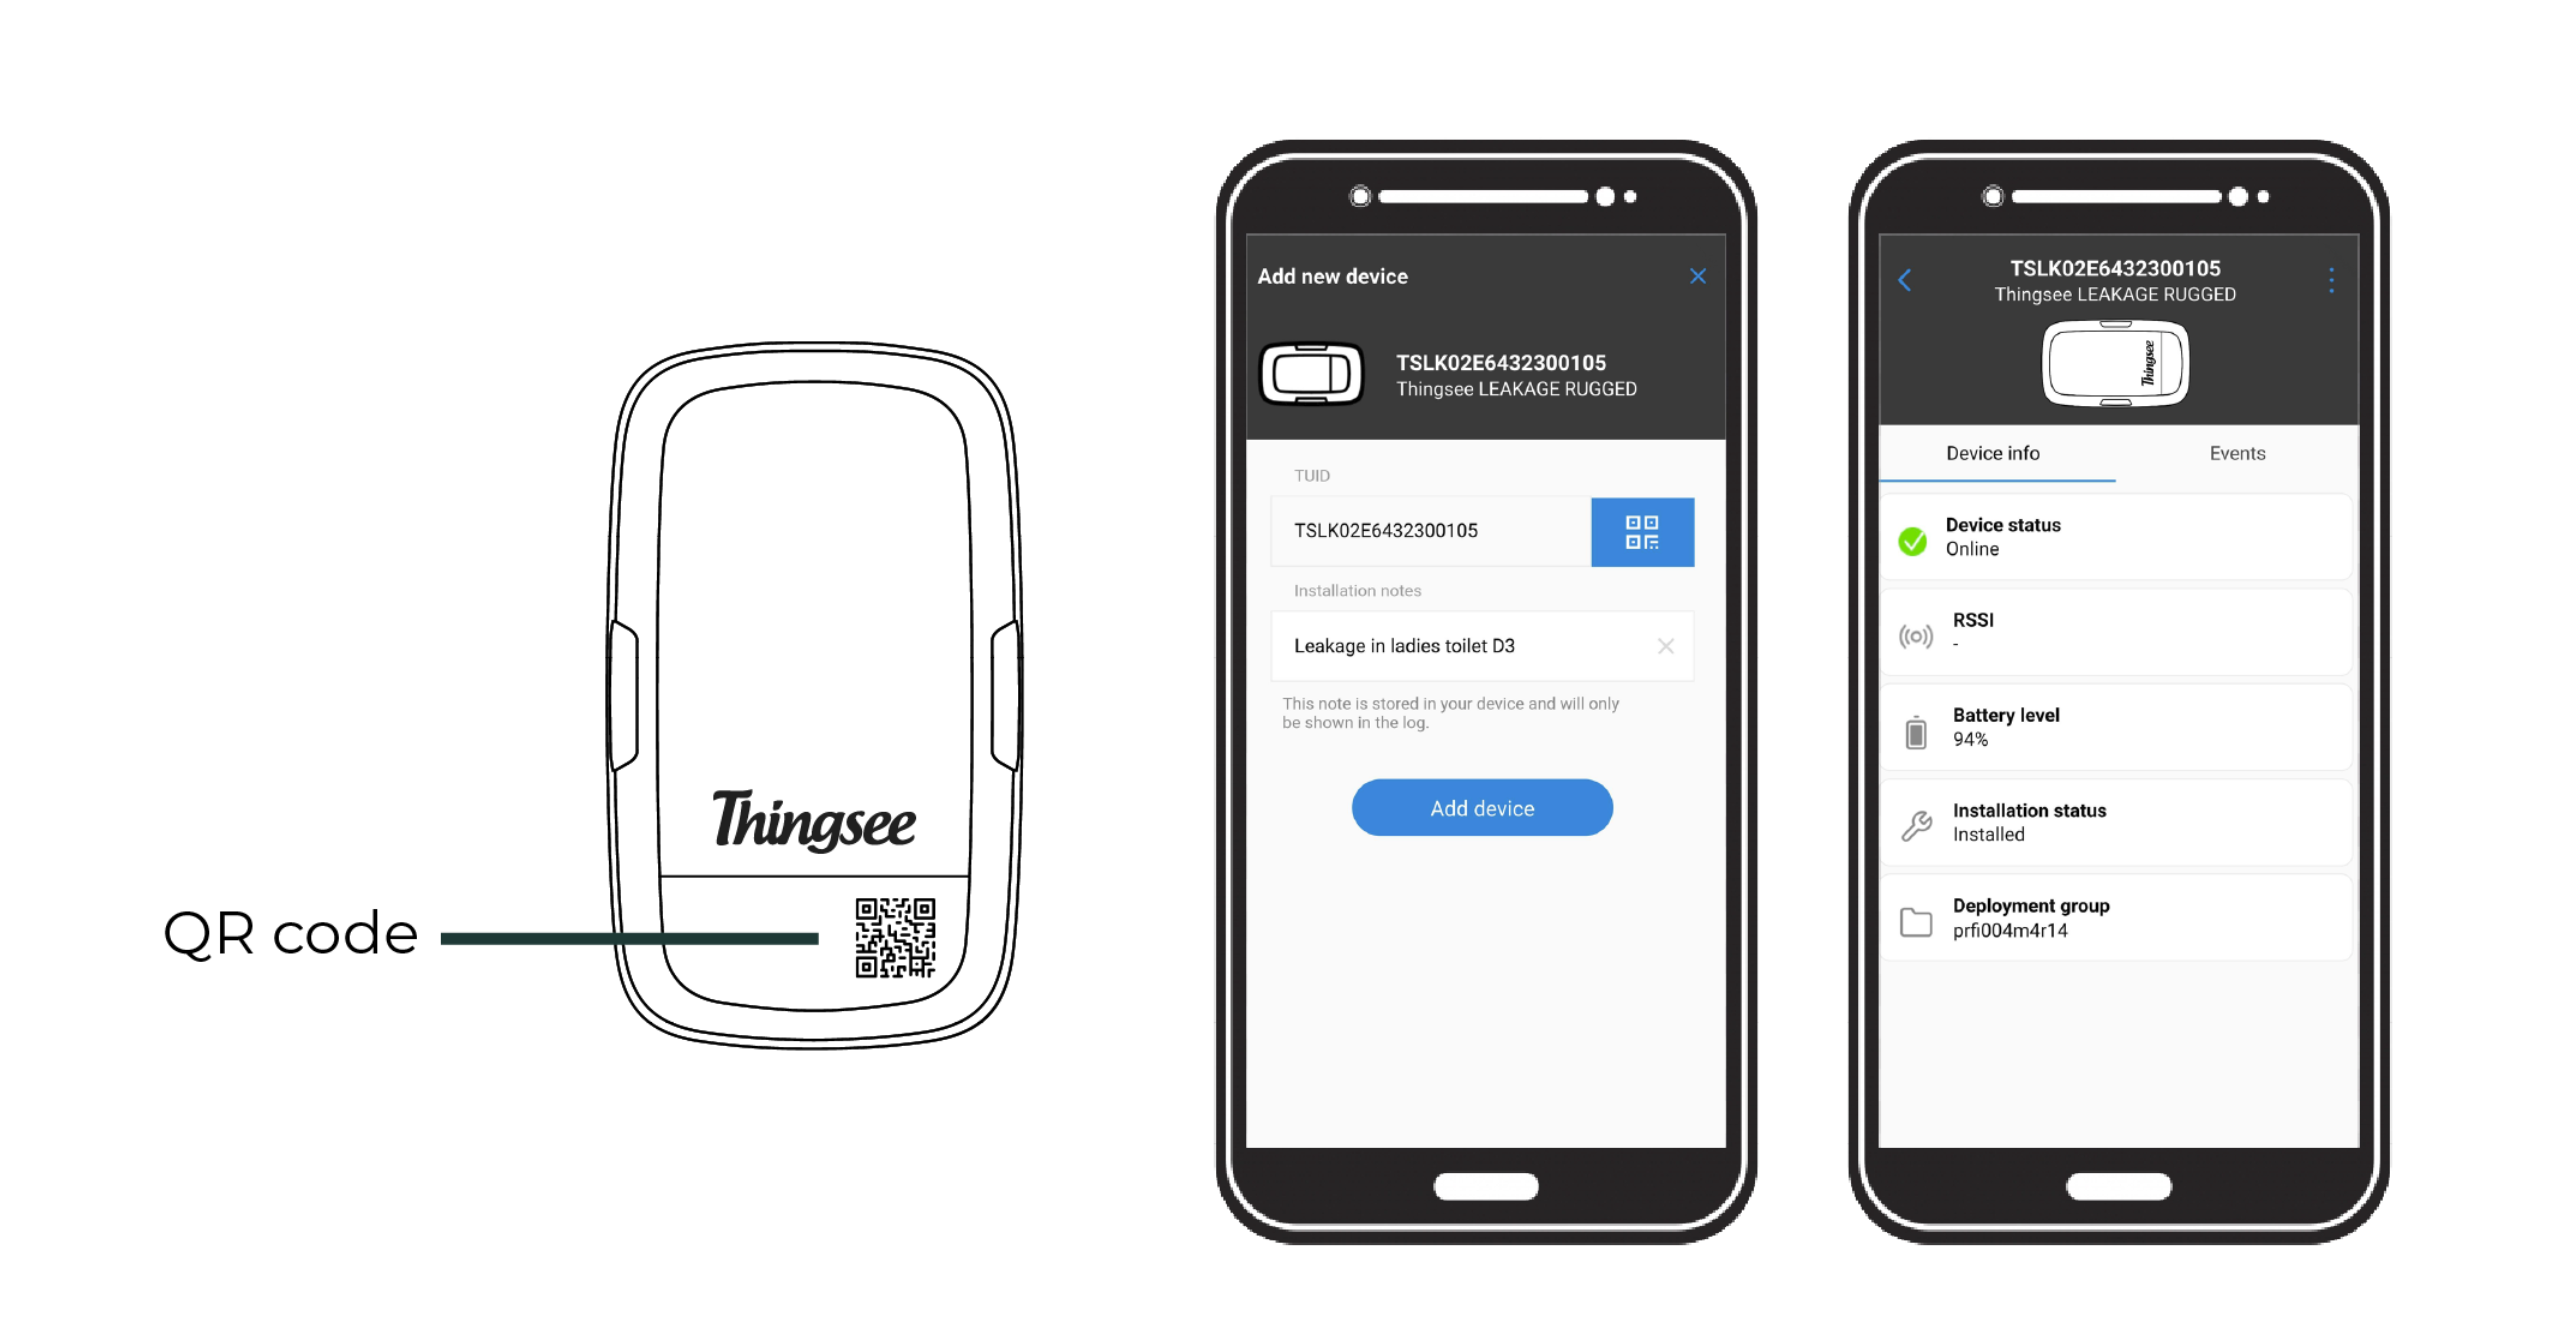
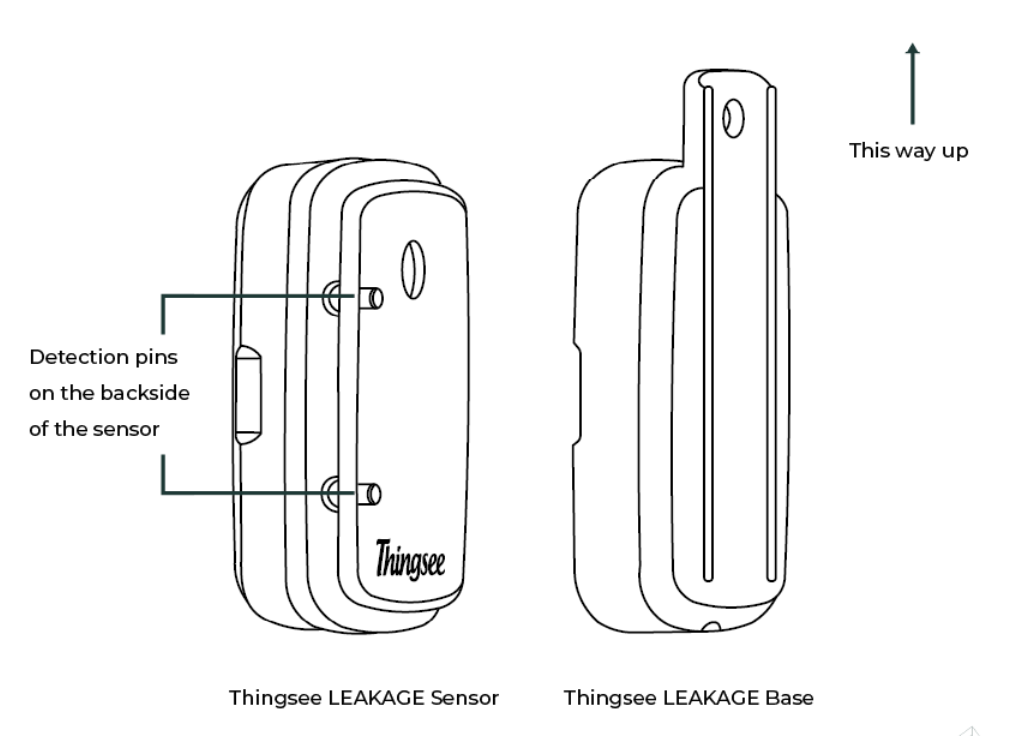
Identifying the Sensor:
Scan the QR code on the front of the device using a QR code reader or the Thingsee Toolbox app on your mobile device. While this step is optional, it assists in managing your IoT setup and facilitates support from Haltian should issues arise.
Initial state:
Before installation, the sensor is in low power mode, indicated by a dimly blinking LED every second.
Activating the Sensor:
Use the Thingsee Sensor Activation Tool by holding it against the sensor’s magnetic switch. Keep it in place until the LED indicator blinks brightly for one minute.
The sensor is ready once the bright blinking stops and the LED turns off, indicating that the sensor is switched on and fully operational.
Installing the sensor on the floor
- Choose the Right Location: Place the sensor on the floor or any surface where leakages, moisture, or flooding may occur.
- Prepare the Surface: Ensure the installation area is clean and free from debris, dirt, sticky residues, water spots, or other impurities.
- Secure the Sensor: Use the provided adhesive tape to attach to the bottom of the device. This helps elevate the sensing pins above the monitored surface for accurate detection.

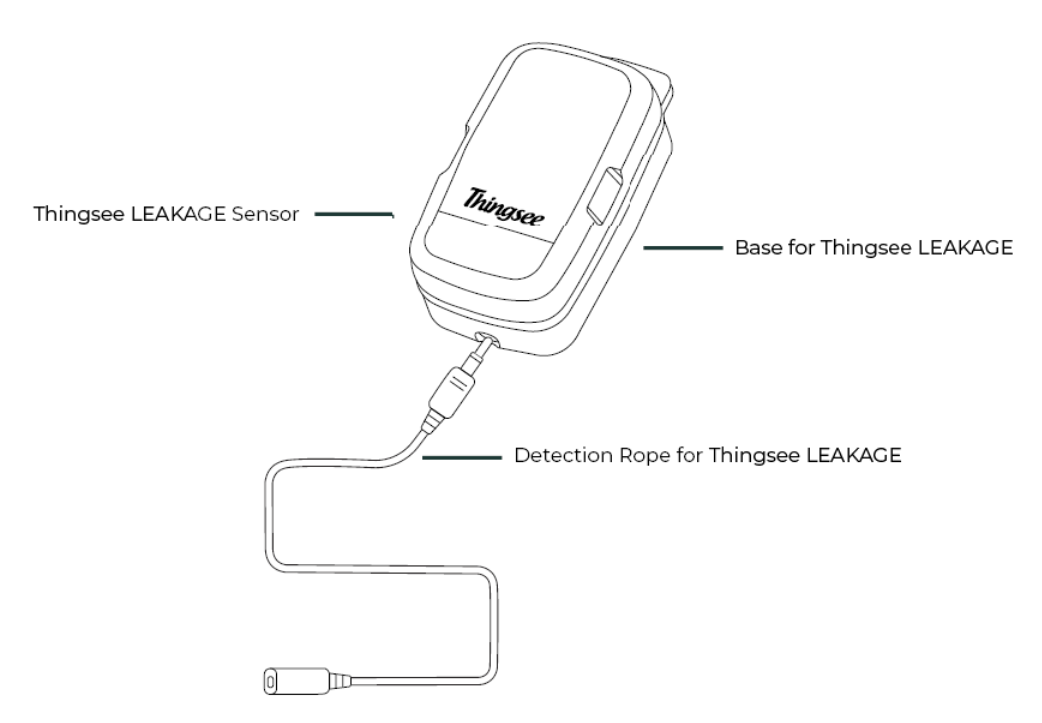
Installing the Thingsee LEAKAGE Sensor with Base and Detection Rope accessories
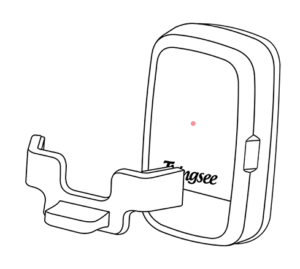
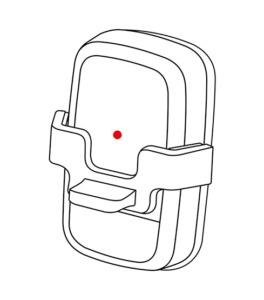
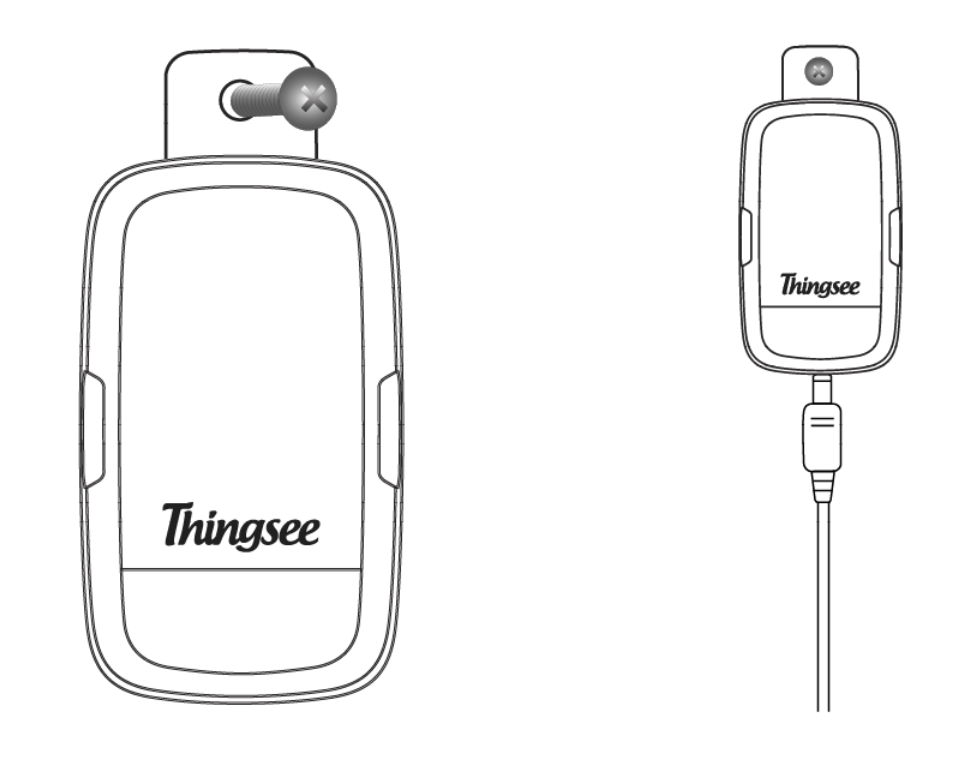
Attach the Base Accessory:
- Begin by snapping the Base accessory onto the Thingsee LEAKAGE sensor. Start from the side opposite the detection pins and then snap on the pins’ side. Press firmly until you hear a click.
- Ensure the Base is correctly oriented: the ‘Thingsee’ logo should be upright, with the screw attachment pointing upwards, as illustrated.
Connect the Detection Rope
- Insert the Detection Rope into the designated port on the Base accessory.
Position the Device:
- Choose a location for the sensor setup where you anticipate potential leakages. Secure the device using screws or zip ties.
Note: Install the Base at a height to avoid direct water contact, as it is not waterproof. The Detection Rope should be laid directly on the monitoring surface. Ensure there is some slack in the Detection Rope to allow for proper laying.
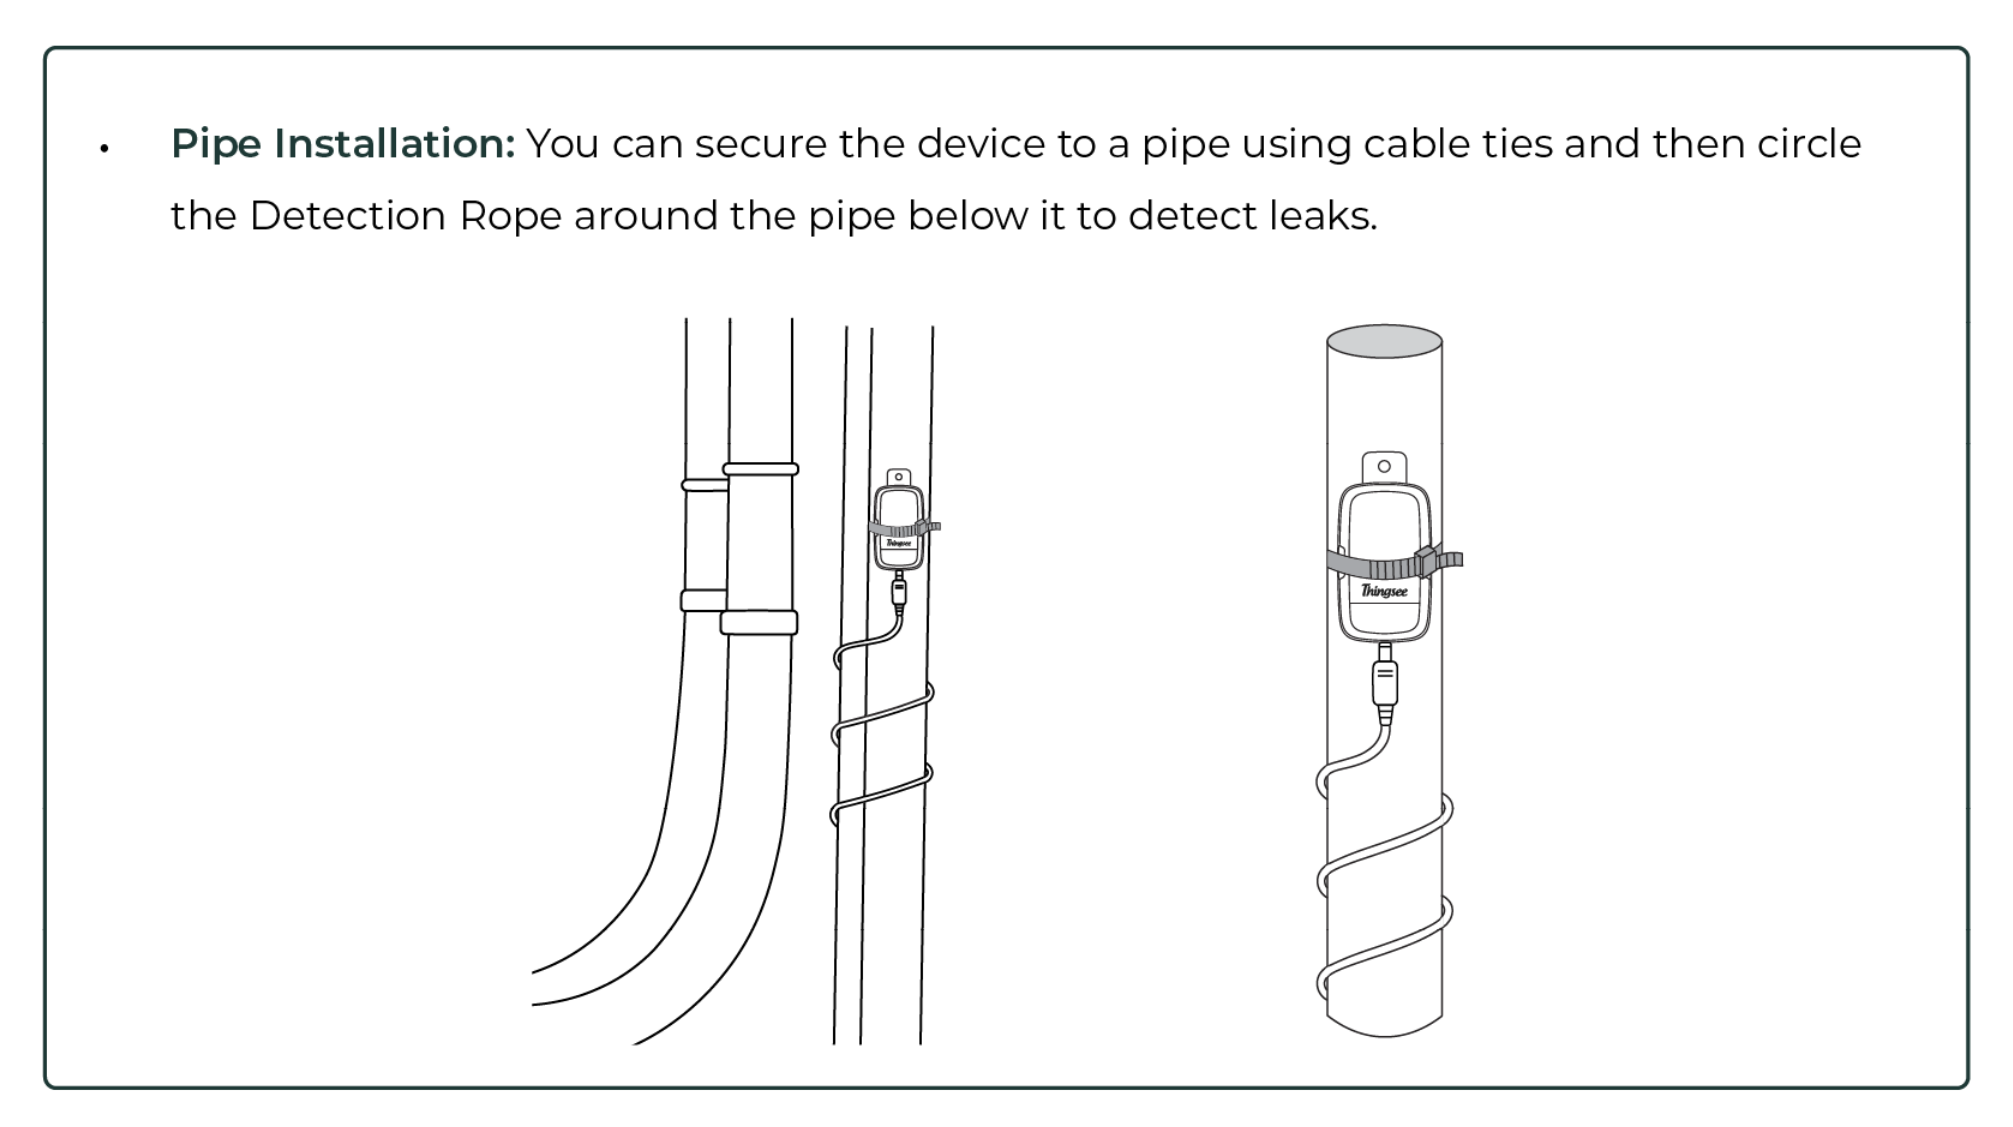
Using the Sensor with Detection Rope
- Flexible Placement: The sensor setup can be coiled around pipes, laid alongside walls, or positioned on the ground.
- Surface Preparation: Ensure the installation area is clean and free from dirt, sticky residues, and other impurities. These substances may be conductive, potentially causing false-positive alerts if they bridge the gap between the detection line and the installation surface.
- Ensure the Detection Rope is thoroughly dried out after a leak has occurred.
- Secure Mounting: For added stability, mount the device on a wall using screws. Attach the Detection Rope extensively to monitor a larger area.
Dos and Don’ts for Detection Rope Usage:
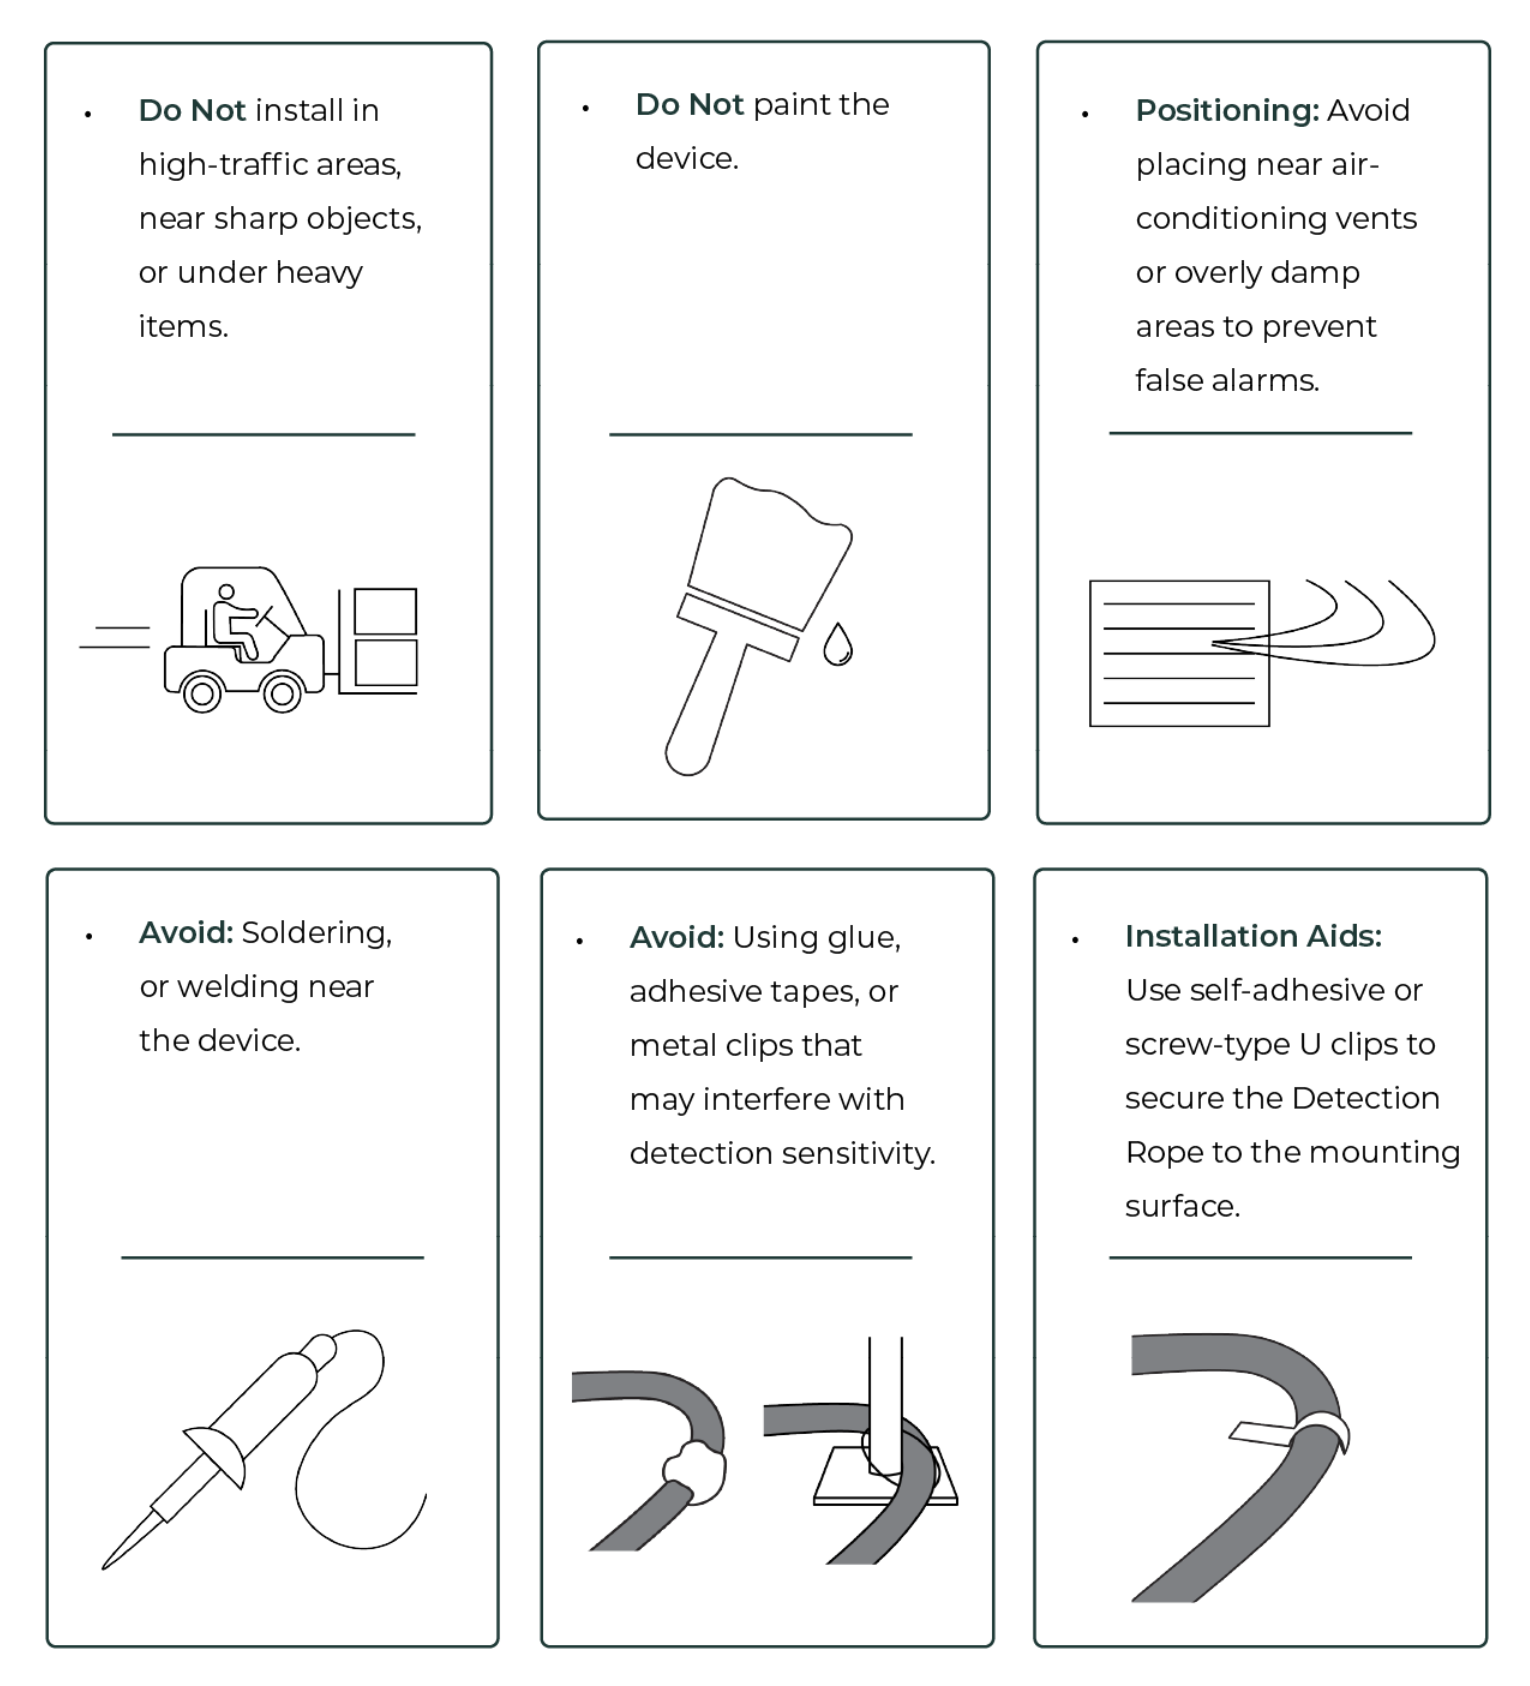
- Maintenance: Inspect the Detection Rope regularly, at least every 12 months. It should be free of dust and contaminants and thoroughly dried after any leak detection.
Further Support:
- For additional installation aids like fixing clips, contact Haltian for purchases and confirm the appropriate type of fixing needed for your setup.